How to connect an electric motor with 380 In to single-phase or three-phase power supply
Let's say, that there is an electric motor on 380 v, but it was necessary to connect it to one phase. In view of the, that the user is not an electrician, for him, this procedure will seem very difficult. But this article can help in this matter, providing some relevant information on this topic.
About that, how to connect an engine 380 In the 380 V, can be found below. There should be no difficulties with this. But with the connection of a three-phase motor to one phase, questions may arise. Therefore, this procedure will be described first.
Before making a connection, that fact should be kept in mind, what to expect full operating power from a three-phase motor, operating in one phase, not worth it. The three-phase motor can quite work on single-phase providing, but its power will be equal at best 70% from its real possible ??power. In addition, there will be problems with the selection of the working capacity at a constantly changing load.
How to connect an engine 380 on 380
Tools, which will be needed in the connection process:
- soldering iron
- arrow voltmeter
- screwdriver
Materials, used in the work:
- electric motor 380
- working capacitors
- starting capacitor
- start button 220 V
- lead
- acid or rosin
- insulating tape
Engine connection 380 V
It is possible to connect a three-phase motor to a single-phase network, using the star-triangle scheme.
Star-triangle scheme
In many domestic electric motors, the star circuit has already been assembled, which in this case involves only the realization of the triangle. This involves connecting three phases and forming a star from the other six ends of the winding.
The star-triangle has a very important advantage. The point is, that when using this scheme, the electric motor realizes its maximum power. The main disadvantage of this scheme is its complexity. This scheme is most often used by amateur craftsmen.
To meet such a scheme somewhere in the production is very problematic, as in such conditions it meets seldom. This fact is explained by the fact, which due to the complexity of the scheme is quite difficult, and pointless, to organize such a time-consuming connection.
The difference between the individual schemes of star and triangle is that, that in the first case six connection terminals are used, while in the second - three. If you take into account the characteristics, then you can see that fact, that star engines run an order of magnitude quieter. But this plus can be offset by a significant disadvantage of electric motors, working with such a connection. The disadvantage is the reduced power when connected to a single-phase network - about 50% from nominal. Electric motor, connected to a single-phase network using a triangle circuit, works louder, but the power is significantly higher and is approximately 70% from nominal.
The video below describes the principle of connecting a three-phase motor, using a triangle scheme.
How to connect an electric motor 380 In the 220 V
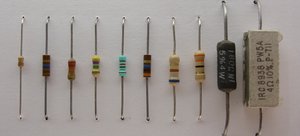
To start, before connecting, should be determined with capacitors. In the named connection two of their types are used at once:
- starting
- working
The first type of capacitor will be used to start the engine. And only for this. When the engine reaches the required number of revolutions, the starting capacitors are disconnected from the electrical circuit. If this does not happen, this will have serious consequences. In other words, it will cause that, that the motor will simply burn out as a result of the current skew in the two windings of the motor.
The main work is designed for working capacitors. In order for the capacitor to work properly and for a long time, then three very important rules should be followed, which will help to ensure efficient operation of working capacitors:
- All operating capacitors must only be connected in parallel.
- The total capacity of the working capacitor should be determined by a special request: on 100 W of motor power 7 microfarads of the working capacitor.
- The nominal voltage of each capacitor is not less 300 Volt.
- Following these rules, it is possible to prolong work of working condensers and not only them much. The operation and durability of the motor also depends on the operation and operation of the capacitors when they are included in the circuit. In the best case, the engine will stop working in one process or not start at all in case of incorrect connection. In the worst case, the motor will burn out and the user will have to worry about it, how to make up for a loss.
It is very important to know, that the capacity of the starting capacitors must be three times the capacity of the working capacitors.
It should be taken into account, that the calculation of capacitance of capacitors is carried out at rated power, so, if the engine is running underloaded, then it will heat up and you need to reduce the capacity of the working capacitor in order, to reduce the current in the winding.
If the capacity is smaller, than required, then power, which will be developed by the electric motor, will be low.
Remember, that the capacitors retain a dangerous voltage at their terminals even after disconnection. To avoid accidental touches, always make barriers around the capacitors. It is recommended to always discharge the capacitor beforehand, how to get started with them.
We must not forget, that the connection of a three-phase motor power 3 Kvt house to standard wiring is strictly prohibited. This connection will knock out traffic jams and machines. It will also be possible to melt the insulation on older wires or in cases with incorrectly selected current protection.
Wiring diagram
-
You must first connect the capacitors. As mentioned above, this should be done, combining them in parallel. This is a very important point.
- Then you need to connect the connection of capacitors with two wires to the motor and to the AC mains.
- In the third stage, you just need to turn on the engine. This must be done in order to do so, to first check in which direction it rotates. If in that, what you need, then no further action is required. Connection made. Otherwise, simple manipulations with the wires should be performed, namely it is necessary to change places of wires of connection to a winding.
For a clearer and clearer explanation of the entire connection process, you can see the attached video below. This detailed video tutorial will help you understand the whole process and at all times, incomprehensible to the reader:
conclusions
Connection of the three-phase electric motor as to a single-phase network, and three-phase, in principle it is not very difficult, especially if there are a large number of schemes, instructions and videos on this topic.
One of the main points when connecting the motor to the mains is to observe safety measures. You should always keep this in mind, that all manipulations with networks, on which the current passes - already a certain risk. So you should avoid all contact with the elements, which are energized.
If there are some concerns and doubts about the implementation of the whole procedure, and no experience, you should consult a professional, to avoid equipment damage and physical injury, because it is better not to risk your health.