Height of installation from a floor of switches and sockets according to norms of the European standard
Today is the height, on which sockets and switches are established, does not have clear regulations. The same applies to their number per room. As a result, premises are quite common, where they are located in an archaic manner and often in hard to reach places. In this material, we will try to understand that, how to properly install sockets and switches, so that they are always available.
Standards for installation of sockets and switches
As mentioned earlier, there are no regulations or rules for the installation of sockets and switches. "Eurostandard" is nothing more than conventionality, as only technical and ease of use are important here. This is confirmed by the Code of Rules for the design of residential and public buildings (SP 31-110-2003), the latest edition of which came out in 2003 year and the Rules of arrangement of electrical installations, prepared taking into account all IEC standards, therefore installation of electric wiring should be carried out proceeding from these recommendations. The following installation rules follow first:
- the switches must be located at the height of the door handle 1 m from the floor;
- the distance from the floor to the socket should also be 100 cm, with, its location does not matter.
Excerpts from the Rules of arrangement of electrical installations
- the switches must be placed in the same way as in the previous document, T. is. near the doorknob in the distance 1 m from the floor;
- the switch can also be placed under the ceiling, if available, includes a cord, falling to the recommended level;
- in the kitchen, all power points must be at a distance of at least half a meter from the pipeline and high enough from the floor;
- in bathrooms electrical units must be installed at a distance of 60 cm from plumbing equipment and the same distance from the floor.
Euro sockets are significantly different from our products. The diameter of the pins and the distance between them in such an outlet is slightly larger. More current: euro - 10-16A, and domestic twice less - 6-10A. So, the first is much more profitable, because you can connect multiple devices to it.
Installation of electrical components in the house
So you know - there are two ways to place sockets and switches in the house. This is t. Vol. European standard and good old, familiar to many, Soviet standards. Let's look at each in detail.
According to European standards, sockets should be at a distance 30 cm from the floor, and switches - 90 cm. But in fact as such standardization has never existed, and this concept came into our lives along with renovations. In accordance, it has a positive and a negative side:
- the socket does not "catch the eye" and does not interfere with anything, and the switch is located at the level of the lowered hand (90 cm from the floor) and it can be included, even without any effort - it's a plus;
- to insert the plug into the socket, will need to bend over, and so that the switch can be clicked, it should not be blocked by anything - this is a minus.
As for Soviet standards, then the opinion about them has recently been divided. Some find them more convenient, others do not, but recently the number of the latter has begun to grow. We will remind, that then the installation of the socket at height was accepted 90 cm, and switches at the level of the human head, T. E. 160 cm. As in the previous case, has its pros and cons:
- the socket is much easier to use, because you do not need to lean towards it, and the switch is located at eye level and does not interfere with the placement of furniture - this is a plus;
- constantly hanging power cords from appliances and the need to raise your hand, to turn on the light and find the toggle with your eyes is a minus.
Tips on the location of sockets and switches
We have already spoken above, that the installation height of sockets and switches according to the "Soviet" standard, in terms of convenience, has long been recognized by many as dubious. The notorious European standard began to be given more preference. Take, let's say, the same sockets, a, more precisely, block of them. He will not be so conspicuous, than a bunch of sockets with "tees" and cords.
The same goes for switches, which are located at the entrance to the room, at the level of the lowered human hand, at the height 90 cm from the floor. So, it can be quickly found at the entrance to a dark room. And in rooms with longer lengths it makes sense to install two circuit breakers at different ends.
Switches and sockets, which do not have protection against leakage currents "to the ground" (UZO, difavtomati), not recommended for installation in toilets and bathrooms. The same goes for the washing machine socket.
How to install them?
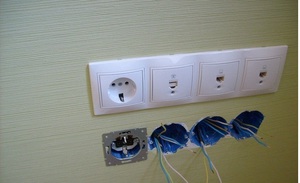
Before installing the socket or switch, on a wall it is necessary to outline their contour. If it is concrete, then the hole is made with a perforator with a diamond crown. Podrozetnik can be made as round, and square. Special mounting boxes are inserted into the finished holes. Construction plaster is used to fix them, plaster or gypsum glue. The box is fastened with sliding feet or screws, and then a plastic case is put on it.
Installation in drywall is slightly different, different and necessary tools. In drywall all the holes are made in advance, where you will need to run the cable. Special feet are used to fix sockets and switches, which should keep them on the sheet.
As for the installation with open wiring, then such cases are extremely rare and mostly they are fixed only temporarily (example, during repairs), as the wires affect the interior. Agree, which is much more pleasant to look at a beautiful wall, where everything is neat and aesthetic.
Installation recommendations
If you want to install wiring and connect sockets with a switch yourself without the help of others, then follow the above tips and rules, which will allow you to perform all the work without problems and, the main thing, safely:
-
the first stage will be the preparation of the plan-scheme, where the future layout of the room will be displayed, with, it must be composed as accurately as possible, so that you can then buy the required amount of cable. Not very nice, when at the peak of work suddenly there will be not enough cable or on the contrary - there will be a lot of unused;
- it is also necessary to mark all the sockets on the walls, which will be needed. At the same time it is necessary to consider height of an arrangement of various devices;
- devices for stationary devices (such as a computer or refrigerator) should be mounted as follows, so that they are both accessible and hidden behind technology;
- regardless, what you install, socket or switch, the order of connection of contacts should not be confused! This is especially critical when connecting a three-pin outlet, in which there are grounding contacts;
- sockets are installed based on the current in 6A, T. is. on a piece on everyone 10 m2 of room area. Two sockets are installed in the kitchen of any area;
- sockets or switches must not be installed under or above the sink;
- the wiring diagram should be selected as follows, to completely eliminate network congestion;
- frequently used sockets should be placed at a height 30 cm, taking into account, so that the cord of the vacuum cleaner can be freely reached from any point of the room.
let's summarize
so, what we learned today? Apparently, the most important thing will be that fact, that there are clear standards or GOSTs regarding the placement of sockets, no switches and wiring, but there are a number of recommendations, which must be followed, primarily for security reasons. But the number of devices with switches should be the same, that operation of household and lighting devices passed as much as possible conveniently, what to consider, composing a project.