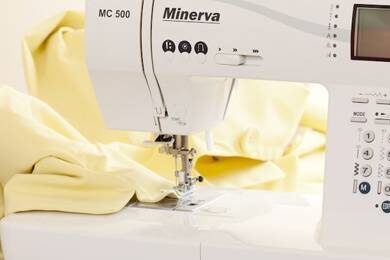
How to set up a sewing machine with your own hands
Sewing machine - an indispensable technique in every home. This applies equally to the old, and new models. Do not be afraid to start work - the main thing is to know, how to set up your sewing machine.
Rules for setting up modern machines
It is quite possible to carry out the procedure of debugging many sewing machines with their own hands - this will help the instructions attached to the technique. And although many devices have the same principle of operation, methods of regulation may differ.
Preparation for work
It is important to properly prepare the device for operation. In most modern models with adjustment special wheels-regulators help, but sometimes you have to work manually. To do this, simply adjust the position of the parts.
First, adjust the spring, presses the thread (winding on a spool) - she twists so, so that the thread does not allow the spool cap to untwist. It is necessary to achieve the necessary tension. The upper thread passes through the whole system. The following thread movement algorithm is followed in the process:
- metal lugs;
- tension regulator;
- thread lever hole;
- brackets;
- eye of the needle.
Now let's deal with the tension of the threads in the sewing machine. Mechanisms will ensure proper installation, located on the end panel for the lower thread and in the shutter screw for the upper. The latter is done as follows: disc-shaped shuttle washers are compressed by a screw - it should be tightened to achieve the desired result.
After the result is checked on a small piece of material:
- hanging loops say, overdone with top tension;
- nodules are examined in a smooth seam (ideal - in the middle and not felt).
It is important to work with the pressure of the foot. Adjustment is a spring. It is important to find the optimal "golden mean":
- the great influence of this detail on the material will shift the folded layers together, will complicate the course and may even tear the fabric;
- weak pressure will give the wrong seam.
Before I deal with this detail, be sure to pay attention to the thickness of the material. In particularly "thick" cases, it is recommended to raise the foot to 1,2 cm. And the thicker the fabric, the harder the foot should press.
The value of pedal operation
In electrically driven machines, the normal operation of the device may be disrupted by drive malfunctions. It is in the pedal speed regulator - if it breaks, it may behave abnormally, example, tear from a place even at easy pressing.
You can fix the problem yourself: graphite "tablets" are compressed together through a spring by a pressure lever, the resistance decreases, and the rotational speed increases. In this case, it is enough to disassemble, clean and reassemble.
However, if after that the machine did not resume normal operation of the speed controller, means, it needs to be changed (probably, oxidized contacts).
Other important points
You should also pay attention to the needle holder - the needle should be inserted into it ??firmly to the stop with a large groove, turned left. The machine has a tooth height regulator? Then with its help it will be necessary to establish optimum height.
Be sure to pay attention to the length of the stitch:
- 1-2 mm for fine thread;
- no less 3 mm for thick.
The position of the shuttle device is also important: example, at Astralux 235 (like many other models of the brand) it will be with vertical installation, and setting up a janome sewing machine involves working with a horizontal shuttle. The following video instructions will help to understand this issue in more detail:
How to set up old-fashioned sewing machines
You may be surprised, how well the old hand sewing machine is able to sew. After learning the intricacies of the settings, you can resuscitate such a unit and enjoy the fruits of their labor. In the first place, it is necessary to get acquainted with the principle of operation of the device like the sewing machine "Singer" or "Podolsk".
- The right part is presented ??wheel (in another name - winder). It is twisted by hand. Stitch length is adjusted with a lever, adjacent.
- The shuttle can be found on the left, next to the presser foot with a needle.
- There are rails on the work surface, which will promote the material during sewing.
How to set up a long-lived sewing machine? First, the numbers of needles and threads are selected - this will help work with different types of fabrics. Next we will take care of the quality string:
- adjustment of a stretched thread from below goes on analogous to janome, can be done, using the screw on the spool cap;
- the upper thread is stretched by a special regulator (it is located near the lever, lowering the foot).
Be sure to check the settings before working!
Seagull
Setting up a sewing machine "Seagull" includes several important points. The main thing here is to install the needle and thread correctly from the very beginning. It all depends on the location of the latter.
The following steps must be taken with respect to the upper thread.
- We turn the handle for installation of the thread-stretching mechanism in the highest position.
- It is inserted into the holder as far as it will go - thus it should be turned by the flat party to a core with a foot.. Then it is fixed with a screw.
- Now let's install the spool of thread - cut it on the designated rod.
- The thread will go that way: thread guide - friction washers - thread tensioner - thread guide - needle holder. The end point is the eye of the needle.
In the lower thread the process will be a little easier: it is wound on a spool. The latter is inserted into the cap and displayed outside. The cap is inserted until the appearance of a characteristic click sound., each of the threads is tucked under the foot.
There are important rules when using the unit.
- Before starting work, lower the foot with the needle.
- We return the handle, directing it to himself.
- The machine is lubricated with oil.
- For work only the fabric basis suitable for all types of stitches is used.
- In "Seagull" there is a disk with 4 positions. With thick tissue, these teeth will protrude strongly, and hide when embroidering.
Podolsk
Many of today's professionals like the Podolsk sewing machine brand., that this device is able to sew quite dense and thick fabrics. You will only need to configure it. First you need to properly tuck the thread.
- The winding device in Podolskaya is located behind, near the flywheel. To the winder the tensioning device is connected also (from the right corner of the platform). It is important to turn off the flywheel wheel at this time, that the sewing part did not work. To do this, simply turn the friction screw towards you.
- The coil is mounted on a winder, and the threaded coil - on the corresponding rod.
- The thread from the spool is passed under the washer at the tensioner and sent up to the spool.
- Now the winder frame is lowered: at the pulley lunch is in contact with the flywheel.
- It is necessary to hold the free end of the thread until the end of winding. Properly covered, it will withstand a great deal of adverse conditions.
The coil is inserted into the cap as follows, so that there was an oblique slit at the top. A thread will go through it to the spring, which will eventually go through the slot again. All this is installed in the device, the free end is displayed in the thread. The air device can be closed.
The needle is set when in the upper position of the needle guide. The flat part of the flask looks to the left, and the long chute blade to the right. The upper part of the thread is started by turning the flywheel and installing the thread lever in the uppermost position. All refueling goes from right to right and left - from the coil to the needle lug. The lower thread is pulled out by turning the flywheel - this will allow the needle to go down and grab the thread from the shuttle, and then climb up with her.
And a few more recommendations.
- Grow a flywheel should be on yourself - from a working man. This will prevent entanglement of the thread in the shuttle.
- When not in use, the presser foot should be raised.
- Before starting the device under the foot should already be a cloth - "single work" blunted teeth.
- It is impossible to stretch and push the working material - there is a risk, breaking needle.
- Close the plate tightly over the shuttle.
- Podolskaya has 3 degree of adjustment of teeth.
There is another general tip for all old cars. The new models have a spring, pressing the spool, and the obsolete do not. One trick will help to set up: a circle is cut out of fabric or thin paper, Less, than the coil in diameter. An axial hole is cut in its center. The circle is inserted into the bobbin case, oil for sewing machines drips on it, and then the coil is inserted there.
Preventive measures to maintain the devices
To resort to the adjustment procedure less often, it is enough to follow the simplest preventive measures for the care of equipment.
- The machine needs lubrication every six months or a year, this should be done only by special means.
- But you need to protect the equipment from pollination much more often. The procedure is simple: at the end of the work it is swept from the surface, shuttle cover and needle plate.
- After sewing, a square of some thick paper is placed under the foot. The foot with the needle is lowered to the stop.
- Before, how to hide a typewriter, need to check, there are no torn threads and fabrics in it.
- Unused device is kept under the cover.
- For the car with the drive it is important to pay attention to a condition of a pedal and conducting. If the wiring will be constantly distorted, then it will just break inside.