How to properly print text on a printer, picture, Photo, page from the Internet, document on two sides, the book
Printing is one of the simplest processes, related to computer technology. However, it also hides a lot of interesting surprises, which even experienced users do not know about. We are ready to reveal some of them.
Working with text
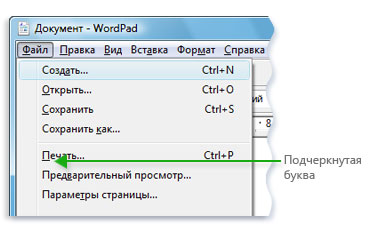
Usually the user types text in MS Word or the built-in notebook from the computer (from laptop). It is recommended to implement the plan in two simple ways.
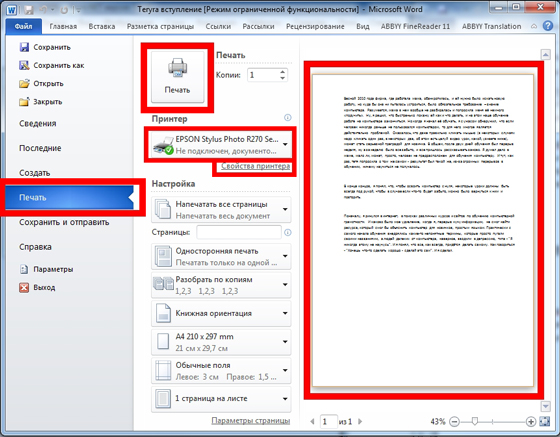
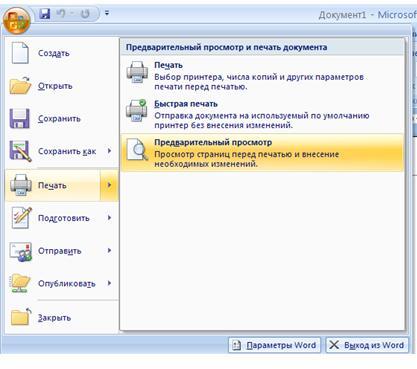
- Sequentially go to the tabs "File" - "Print" - "Settings".
- Use hotkeys (press Ctrl and P at the same time), which will do without the settings of the top menu.
It is recommended to pay attention to the preview before sending, the function of the same name which is displayed together with the text on the right. The following settings may come in handy:
- specify the required number of copies;
- select a single area of text or pages to print;
- a type (one-sided or two-sided printing);
- orientation (book or album);
- required format (usually standard A3, A4, A5);
- field sizes and other parameters.
If all this is not done, then by default a A4 document is printed with a book orientation in the amount of one copy.
The text document can also be presented in a common PDF format. To open it, must be installed on your computer ??free reading program from adobe. If not, then you can print, by dragging the PDF file directly into the browser. Then we already know the commands "File" - "Print". It remains to select the printer and, if necessary, make settings for the range of pages.
Internet Explorer
Printing from the Internet with Internet Explorer is similar to Mozilla in many respects. You can configure it this way.
- If you need to print only the selected fragment, you need to mark the setting "Selection". Or vice versa "Everything", if you plan to print content.
- There is a quick launch button. Bypassing all settings, it will immediately start printing everything presented on the screen.
Internet Explorer is not recommended for printing, because it can print text along with advertising, even if the latter intends not to stand out.
How to print from a smartphone
Working with browsers also indirectly affects the problem of printing from the phone. More precisely, there is no problem with that - a lot of services have appeared today, which will help to send the necessary information to the printer directly online.
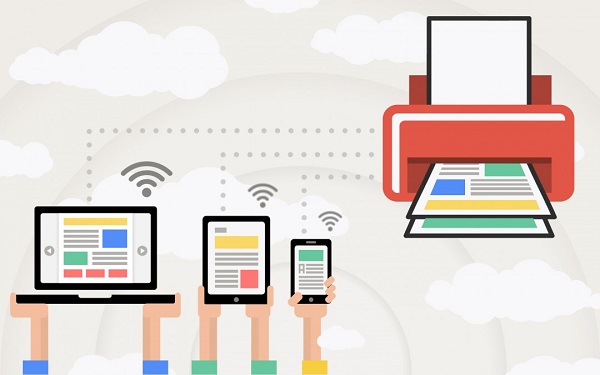
If, when there is no technology on the printer Bluetooth or Wi-be, Google Cloud Print registration required. This service technology will allow you to carry out your plans from anywhere on the planet with an Internet connection.. The service allows you to work with almost all currently available printing devices, however, this connection works best with Cloud Ready devices. But even the simplest printer is fully connected to this "cloud" printer:
- to launch Google Chrome browser;
- in the settings menu, select the advanced option;
- at the bottom you need to find "add printer";
- then you need to log in with your Google Account;
- will have to "add a printer" again, than the user confirms the registration.
It is important to understand: to make it happen, the device must be connected to a device with an Internet connection.
The following should be done on the phone.
- Download to Cloud Print smartphone. Connect to it through an account.
- Select a file.
- Select your printer again in the new screen.
- Make settings.
- Click on the "paper plane" - the information will be printed.
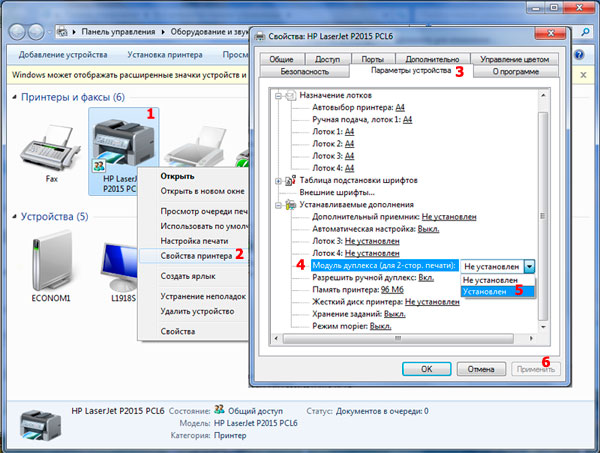
How to make two-sided printing
Some modern devices have the function of printing on both sides of the sheet. To run it, you need to do the following.
- Click the Office icon at the top right of the document, and we will get to the required section. Select "Print", which will open a familiar window (you can also run the ctrl combination + p).
- Select "Properties", that opens distinguishes the window in different models. If there is double-sided printing (or called "Print on both sides of the sheet", "Print with turnover"), then it will be enough to activate it.
- In the absence of such a mark, Two-sided printing is checked in the dialog box. After the prints of the pages, located on one side of the sheet, in the Word document there will be a mention of the need to turn the result and return it to the feed tray.
There is another manual way to print on both sides, which consists in alternately sending first all the odd ones, and then the odd-numbered pages of the document. But in this case, a large percentage of errors is not excluded (especially with a large number of sheets). Of course, you can only select even or odd pages - this option is present in the "Include" tab, which falls in the lower left corner of the same dialog box.
Look, whether the device could not perform two-sided printing, you can in the commands "File" - "Print" - "Options". In the MFP, the equipment will automatically support this possibility. Among such models it is possible to note, example, Canon Pixma mg3140 - easy to use and provides printing capabilities, scanning and photocopying in one device.
That such printing took place without human participation, duplex can be used in the unit - this is a method, in which the paper after printing on one side will go back to the printer without turning over.
own book
Speaking of double-sided printing, it turns out, that it is quite possible to print your own book, without resorting to the services of printing workshops. And, you can do this through the printer settings, and in the Word document itself.
The only caveat is that it is not recommended to do more in such a brochure 80 pages, otherwise it will be inconvenient to fasten.
Printing in the form of a book through the settings on a laser printer is as follows.
- After selecting the "File" - "Print" commands, go to the printer settings. All modern devices have a function, which helps to print several pages on a sheet. Here you will need to select sequentially "Mode" - "Left-Right". This allows the device to print pages sequentially 1 and 2 on one sheet.
- To properly seal the entire book, importantly, so that the total number of pages of the reproduced document is a multiple of four. It will be necessary to determine otherwise, which turns can be left blank or make gaps there.
- Define and enter the sequence of pages for both pages of the letter - do it through a comma. You can then send it to print.
- The pages that came out of the device are raised and, without changing their position, refuel in the printer tray. Letters cannot be turned over! After that it is necessary to print the second range of pages, that is, repeat all the same described early actions.
- The following should be done for the displayed range of pages: there will be numbers on one side: 1,4, and on the other - 2,3. This is repeated with all pages of the document.
You can set up to print a book file directly in the print settings from your computer. However, in this case there is a risk of skew fonts and other parameters. For those, who is determined to try, such an algorithm is proposed.
- Select "Print" via "File" 2 in the "Number of pages per sheet" parameter.
- Set numbers 1 and 4.
- Print the page on the printer, turn it over and repeat this whole procedure for the numbers again 2,3.
For MS Office versions 2007 and newer, you need to act in a slightly different sequence: Page Layout - Options - Fields - Multiple Pages - Brochure.

You can collect the text "book" in Word itself. You will need so many editor tools to design.
- The first step is to determine the correct page orientation. You can do this in the "Page Layout" tab.. Now in the "Page Options" in the orientation select "Book" (with the height of the sheet greater than its width).
- Next is "Field Settings". Not based on "Page Options", you need to click "Fields", then "Mirror Fields". It will help to do so, that in odd documents the left field was wider, and in pairs everything went the opposite way.
- Through "Fields" - "Customizable fields" you can leave space for the cover. In the dialog box, select "Fields" - "Cover" and enter the required value. Do not forget to save.
- To choose your own book format, go through "Page Options" - "Size". Select the desired value from the drop-down list.
- For your own style, choose "Home" - "Style". In the appropriate tabs, you can experiment with the font and paragraph.
- Before sending text to print, read the options for printing text in the dialog box of the printer. Pages can be displayed as automatic, and after manual user configuration.
The conclusion of the test page
Printing this page is a check on the correct settings and the amount of consumables on the printer. It is on it that one can evaluate, whether the default settings are appropriate or whether you need to set your parameters. This feature also helps you see problems with Canon devices in a timely manner, HP, Epson and other brands.
Here's how to get a test page based on the Windows operating system.
- From "Start" (Task bar) you need to select "Control Panel", in which to find "Printers and faxes" ( "Devices and printers"). In the field that appears, select the current printer, which is launched by right-clicking.
- The following commands and tabs are selected sequentially in the menu: "Properties" - "General" - "Trial printing".
- At the first performance of such task (or debt simple apparatus) you have to wait 15-30 seconds, to start the launch.
What should be on the test page:
- graphics;
- text and other samples of all colors, in which the device works;
- the printer should be missing the print turned out (on the jet - traces and stains of paint, on the laser - light and dark stripes);
- absence of distortions and inequalities.
If all the information presented through trial printing suits the user, then click on "Save default settings".