How to properly connect the stove to the network
Many modern houses are not gasified, therefore, their 8 inhabitants have no choice: you can only install an electric stove. Of course, it is recommended to do this with the help of a wizard, since there are many nuances of connection. If you still decide to do it without the help of professionals, we will tell, how to connect the hob yourself.
Site preparation
Before connecting the electric hob, you need to choose the right location in the kitchen space - you need to follow simple rules.
- The installation location must be level, so that a stable horizontal position can be ensured when adjusting the legs.
- The length of the wire should be selected as follows, to be free, if necessary, push home appliances away from the wall, without disconnecting it from the network.
- Users need to remember, that the heated burner can be heated up to 100 ° C, therefore, do not place the hob next to the refrigerator.
- When built into the kitchen set, it is necessary to protect the plastic panels from overheating during operation of the appliance.
- It is better not to place other electrical devices in the immediate vicinity of the induction hob - its electromagnetic field will affect the quality of their work..
The umbrella of the exhaust system can be a decisive factor when choosing a place, which must be above or behind the hob, depending on the hood configuration used.
Basic requirements
Installation and proper connection of the electric stove may not work, if you do not follow the special rules for the installation of electrical appliances.
Importantly! If you perform all stages of connection yourself, then you may lose the right to warranty service of equipment in the service center.
In a modern city apartment, all the work is easy to do - there the builders have already installed a special outlet or junction box. This saves a lot of time and allows you to connect the electric stove faster. But homeowners of private buildings or residents of old apartments will have to do everything yourself, exactly following the recommendations, that the installation and subsequent connection to the home network of the electric stove was performed at a professional level.
Materials needed for the work:
- three-core cable with a cross section 4-6 mm - it depends on its length: the longer, the thicker the dissection, to withstand stress;
- separate machine gun in the shield, to properly connect appliances (it is bought on 32 or 40A, depending on the cable cross section);
- ELV - protective tripping device, which protects expensive equipment from overvoltage;
RCDs and circuit breakers are mandatory components of the circuit diagram of the electric stove, regardless of its model. They will save your assistant from quite frequent voltage drops in the city power grid. Be sure to install them on one mounting rail to the meter, while the nominal value of the RCD is always greater than the machine. It is also necessary to make grounding near the house.
Cable installation
If the builders removed only a three-core cable, then to install a special socket for an electric stove or terminal box you will need to drill grooves in the wall to deepen the cable - these works require certain skills and take a long time, but as a result, the interior of the apartment will not be affected, and the cable will be hidden in the wall. Before that, the user must decide, what type of connection will be relevant:
- connect directly;
- installation of a transfer case;
- socket installation.
Directly
Experts consider such connection of an electric stove the safest, because the lack of additional wires greatly reduces the risk of overheating of the equipment. In new buildings, builders often do not burden themselves with all sorts of boxes and sockets - they leave the cable insulated, and the rest should be decided by future residents.
Through the terminal box
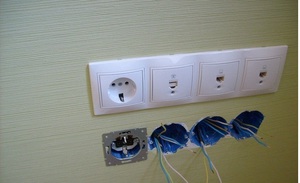
Connect the electric stove with your own hands in the absence of a plug on the wire (this situation is typical of many modern models) possibly using a terminal box or transfer case, which is present in new luxury apartments. Such a box is installed on the kitchen wall at a level not lower 60 cm from the floor, and the plate should be placed no further than 2 m from it.
It can be made of metal or strong enough plastic, the top is closed by a cover.
There is already a home network connection inside, all you have to do is find out, how to connect an electric stove. The scheme is quite simple: black wire is a phase, blue - zero, and yellow corresponds to ground. Connect all three cores to the box, focusing on colors, and it turns out so, as shown in the photo.
Check the tightness of the connecting screws and close the cover. As a result of our actions should come out, as in the photo below.
Through an outlet
The next type of connection of electrical appliances to the network is the installation of a socket of a special configuration and with mandatory grounding.
Today, the kitchen uses sockets of three main types.
- Russian design with the upper location of the ground wire, its entrance is rotated 90 ° to the other two holes.
- Manufactured in the Republic of Belarus - all contacts are rotated 120 °.
- European view - two round contacts, and the ground is flat and located at the bottom of the device. This is an outdated option, because many countries have now switched to their own types of outlets.
If there is no need to do wiring, then the installed socket in the kitchen should be checked with a special device to determine the phase.
Wiring diagrams
Standard wiring diagrams do not depend on the method of connection you choose to the home network and there are three types: one-, two - or three-phase. If your stove is designed for 220V, then you need to use the first option, and if at 380V, then the second and third options apply.
To find out the wiring diagram for the purchased hob, it is necessary to unscrew a protective cover on a terminal box from the back - on it all possible options are specified.
One phase
To a single-phase network connection in city apartments of high-rise buildings is carried out, where all wiring is done with a three-core wire. To connect new appliances without mistakes, it is necessary to use special jumpers with copper section not less 6 mm - they are usually present in junction boxes. If for some reason they are missing, then they can easily be bought in an electrical store. The connection is made according to the following scheme:
- connect the screws with a bus № 1, 2, 3 with the symbol L;
- the second bus will connect the screws № 4 and 5, marked with the letter N;
- the remaining loose screw with the letters PE is used to connect the ground.
The wires should be distributed as follows:
- black or brown wire is a phase, connect to terminals L 1, 2 and 3;
- blue or zero - fixed at № 1 and 2;
- green - ground to the appropriate terminal.
The established order of connection is developed by engineers-experts in the field of electric devices and is not subject to discussion.
Two-phase connection
This scheme is most often used in private homes, but it can be used in the apartment, when the wiring consists of a wire with four cores. In this case, put the jumper between the screw №1 and L1, the second - screws N4 and N5, and the screw L2 and for grounding remains free (div. scheme 2N). How to properly connect the wires, shown in the photo:
- the yellow wire is connected to the jumper terminals L1 and L2 - this is the A phase;
- red core - to terminal L3, phase C;
- blue winding - to the jumper of the zero terminals №4 and 5;
- the green wire is the standard ground.
Users need to remember, that the plug at such connection is used with four pins.
Three phases
This type of connection is used only in private buildings or houses of very old buildings, in modern apartments is practically not used. External complexity should not frighten the homemaker - the implementation of this connection is quite feasible with the exact implementation of the recommendations.
The installed option uses a cable of non-standard cross-section with the number of cores 4 or 5 PC., only one bus for neutral terminals is used № 1 and 2, cores must be connected in this order:
- phase A - yellow wire is connected to contact L1;
- B - contact L2, lived with a green winding;
- C — L3, red wire;
- N - the blue wire goes to the zero contact bus;
- the ground wire is connected to a similar terminal.
Council! Before choosing your connection option, consult a specialist, in the future it will save you from mistakes and allow you to do it right and with good quality.
Before, how to turn on the oven, check the connection of all hob burners (the scheme of their connection is in the operating instructions). This meticulousness will save you from a short circuit, which can happen because of that, that the wiring connection in one of the terminals is loose during transportation.
After installation of a plate on a place of permanent dislocation we include it - the indicator will inform about correct work, which is located on the control panel.
That's the whole method of self-connection of an electric stove, which is not very different from connecting any electrical appliance. Everyone should watch this video, before starting work: