How to remove the cylinder head on the engine
Cylinder head (GBC) is one of the most important components of the engine. At the head of most modern engines is a gas distribution mechanism, partially manufactured combustion chamber, made channels of lubrication and cooling systems, on which working liquids circulate. In the event of certain malfunctions, it may be necessary to remove the cylinder head to repair the head itself and the mechanisms inside it., and to gain access to parts and elements in the cylinder block (example, CPG).
We also recommend reading the article about it, how to properly tighten the cylinder head bolts when installing on the engine. In this article you will learn about the features and sequence of tightening the cylinder head bolts, and also about various nuances during performance of this procedure by the hands.
Reasons, on which it is necessary to remove a head, may be different. Quite often the cylinder head is dismantled as a result of engine overheating, in case of need of replacement of a lining of a head of the block of cylinders or repair of GRM. Cracks in the body or other defects are also a frequent reason for removing the head.. In such situations, the head of the unit is removed for diagnosis on a test bench and then repaired. Quite often modifications of the engine during insignificant tuning or deep forcing of the engine provide dismantling of the cylinder head. Note, that this operation is considered quite serious and requires certain skills and special equipment. For this reason, we intend to talk about it further, how to remove the cylinder head yourself and do it right.
Removal of cylinder head: procedure and general recommendations
- Before starting work on the removal of the cylinder head should have all the necessary tools, as well as a torque wrench. It is also highly desirable, to have on hand a guide to repair and maintenance of a specific model of the power unit.
- All work is best done in the garage, which has an observation pit, or on the lift. As a last resort, you can use the flyover. The general preparation process before removal involves disconnecting the terminals from the battery, then the battery itself is removed.
- The next step is to disconnect the ignition wires, opening the connectors of various ECM sensors. Then technical liquids merge, all hoses are disconnected from the head, pipes and pipelines. It is recommended to mark all removed parts with a marker, and stick stickers with labels. This will greatly simplify and speed up the process of reassembly. Attachments are then detached from the head, which will interfere with the removal.
- After, how everything will be disabled, you can start removing the cylinder head. First of all, the cylinder head cover must be removed, remove the timing belt and its protective cover, and perform all other related operations. At the end of the bolts securing the cylinder head must be unscrewed in strict accordance with the scheme, which is present in the manual for operation and repair of a particular model of vehicle.
Given the above, it becomes clear, which has a fairly large amount of work. Thus correct performance of this procedure will allow to save money considerably, especially when it comes to the need for future major engine repairs. Now let's take a closer look, how to remove the cylinder head on the engine with your own hands. As an example, consider the removal of the cylinder head on the well-known model Daewoo Lanos with engine displacement 1,6 liters and 16 valves.
How to remove the head of the unit yourself
First of all, let's start with the tools. You will need heads for the disassembly procedure: socket wrenches with socket head, torque wrench, flat screwdriver, pliers, than, hammer pliers, separate tanks for draining antifreeze and engine oil. Note, that for effective removal of cylinder head in garage conditions it is better to carry out this procedure together, that is, you need to invite an assistant. The point is, that the head itself has a significant weight and it is not so easy to get yourself from the hood space without a special tool. At the same time, you may encounter difficulties while disassembling the engine, who need help from another participant.
As already mentioned, the machine must be pre-prepared before disassembling the head. Preparation involves draining engine oil and coolant from the cooling system, dismantling of attachments, disconnection of pipelines and other elements, which may interfere with removal. It is important to understand, that such work is not desirable to carry out on a hot engine, that is, immediately after stopping the engine. First, the engine should cool down a bit, then drain the engine oil. Next, reduce the pressure in the fuel system, then the antifreeze merges.
so, all actions in order.
- If there is a plastic decorative cover, closing the engine from above, then it must be removed. It is also advisable to immediately remove the crankcase protection (in the presence). You will then need to disconnect both terminals from the battery, push the power wires aside and remove the battery.
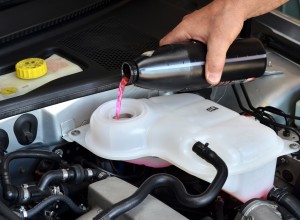
- Then pour the oil and coolant into the prepared containers. To drain the oil, unscrew the drain plug in the pan. To drain the coolant, you need to unscrew the cover of the expansion tank and the drain plug on the radiator of the cooling system. After draining the working fluids, all plugs and lids can be tightened.
- Now you need to remove the collar, how the coolant supply hose is attached to the radiator of the stove. To remove the pliers, the metal hooks of the clamp are pressed, then the clamp slides along the hose. After that the hose is removed from a branch pipe.
- Now you need to loosen the tension of the drive belt of the generator and the power steering pump, then the belt is removed from the pulleys. In parallel it is necessary to unscrew a bolt of fastening of a lateral lath of the generator. This will turn the generator located on the mounting bracket and move away from the motor.
- Next, you should pay attention to the phases of gas distribution. In order that the phases do not get lost, the piston in the first cylinder needs to be exposed in TDC.
- Then you need to disconnect the wiring harness holder from the bracket. The harness pad will require similar actions. The specified pad and coolant temperature sensor must then be disconnected. Next you need to cut the collar, which wire is attached to the hose. You can now disconnect the oxygen sensor harness harness. After that the plait of wires is taken aside.
- The next step is to remove the air filter and its housing, then the timing belt is removed. Then you need to remove the camshaft pulley. To remove the pulley is fixed with a screwdriver and pliers from scrolling, then you can unscrew the mounting bolt of the pulley.
- Now you can loosen the clamp and remove the radiator hose from the thermostat cover. In parallel, the rear cover-cover of the drive of the gas distribution mechanism is removed.
- Next are the RHX connectors, DPDZ and fuel injectors are disconnected from a wiring harness. After that, the throttle actuator tip is removed (is in the groove). The rubber damper of the cable is also removed from the slots in the bracket, that will allow to take away a cable so, so that the element does not interfere with further removal of the cylinder head.
- Next, go to the cover of the head of the unit, from which the crankcase ventilation pipes are disconnected, air supply, etc.. d.
- Then the inlet air pipe is removed, which disconnects from the choke. You also need to remove the solenoid valve of the USR system, the coolant temperature sensor is disconnected from the wiring harness.
- The next step is to disconnect the fuel drain hose from the fuel pressure regulator fitting, as well as the drain hose from the fuel filter.
- You can now loosen the clamps and disconnect the coolant supply and drain hoses from the throttle pipes.. The adsorber ventilation hose is removed in parallel, the absolute pressure sensor is disconnected from the inlet pipe. Additionally, you will need to remove the collar, which fastens the hose of the vacuum brake booster.
- You can then disconnect the ignition coil and wires. The tips of the spark plugs are removed from the spark plugs, the wires themselves are disconnected from the ignition coil and removed from the engine compartment.
- Then the bottom fastening bolt is unscrewed by a key, which holds the inlet pipe bracket. A pair of upper bolts is also unscrewed with a socket wrench. Then you can remove the holder of the cooling system pipes, which are under the bracket. The receiving pipe is then disconnected from the exhaust manifold.
- At the end the bolts are unscrewed, by means of which the head is connected to the block of cylinders. Bolts should not be unscrewed immediately, and in several approaches. Twice the head bolts are loosened by only half a turn, and only then unscrew completely. It is necessary to unscrew bolts taking into account a certain sequence, which, usually, the opposite sequence of puffs. This information can be found in the manual.
- After unscrewing the bolts should be removed, remove the camshaft housing and dismantle the cylinder head. The head can be removed both together with an inlet pipe and an exhaust collector, and separately. This will depend on the specific need to remove certain elements.
The cylinder head is stuck: What shall I do
In some cases after unscrewing of bolts it is not possible to remove the stuck head of the block of cylinders, the pins may also not be unscrewed. The head of the unit can be attached to the gasket or first dragged on the pins. In the second case, the aluminum body of the cylinder head "compresses" the pins and holds them firmly. As a result, it is not possible to move or raise the cylinder head.
In this situation, there are several ways to solve the problem in the garage. First of all, try to tap the head on all sides through a wooden spacer. If that doesn't help, then you can pour a little vinegar on the pins, then it is easy to tap on the ends and sides of the head. You can also soak the pins in the wd-40, then start shaking your head up and down.
Another way is to raise the piston in the first cylinder almost in TDC, but yes, so that there is little space left, that is, the piston was in the compression stroke. If the design allows, you can navigate the slider slider, which will be in the position of the first cylinder. It turns out, the valve will be closed. Then a little engine oil is poured into the cylinder through the spark plug hole, then the spark plug is twisted. After the engine is scrolled manually, causing the head to move out of place in that case, if the mounting bolts are completely unscrewed. It happens, that only the front part will rise. This means, that the procedure should be performed with the fourth cylinder. Let's add, that some craftsmen do not scroll the motor manually, and the starter. At the same time do not forget, that there is a risk of bending the connecting rod. If the head is gone, then it must be rocked and then try to lift.
We also recommend reading the article about it, how to replace the timing chain with your own hands. In this article you will learn about the features and procedure for self-replacement of the timing chain.
It happens, that no way helps, then one of the simplest and at the same time dangerous decisions can be considered as insertion of a wide flat chisel by driving directly a cylinder head gasket. You need to score carefully, so as not to damage the landing plane of the unit and the head. Note, that in some cases the plane is still damaged, what is the main drawback.
Another solution, which helps to unscrew the pins, there is their unscrewing by means of a so-called stud or by means of installation of two nuts. You can also screw nuts on the studs, then scald them by welding and unscrew like ordinary bolts. The downside is that, that the pins in this case will need to be changed.
Let's summarize
After all repair work on the cylinder head, further assembly should be carried out in reverse order, exactly following the tightening torque of the bolts and the scheme of tightening the head with a torque wrench on a specific engine. In parallel it is necessary to check up a condition of branch pipes, hoses and reliability of fixing of all collars, replacing, if necessary, individual parts and fasteners with new ones. Let's add, that before assembly it is desirable to have in stock new clamps.
It is important to ensure this during the assembly process, to wires, sensors, connectors and pads were securely fastened and connected. At the final stage of installation of the cylinder head and the final assembly should be filled with technical fluids, check the installation of the timing phases and the coincidence of the timing marks, then you can start the engine. After startup, the functionality of all systems is additionally checked, as well as the tightness of the joints.
Similar records

 Auto
Auto