How to make wiring and adjust the lighting in the garage with your own hands - diagrams, instructions with photos and videos
Traditionally, garages are built without windows. This is due, on the one hand, safety requirements - storage of fuels and lubricants poses less of a threat to neighboring buildings, if there are no windows in the repository. On the other hand, lower risk of intruders, which is also important. Car thefts, Unfortunately, not uncommon. Of course so, that garage lighting is not an empty question.
Garage lighting options are possible
Garage electrification, which belongs to the class of utility rooms, is a set of activities. In order to better imagine the implementation of each stage of this work, it is necessary to get acquainted with types of lamps, which can be used for lighting. Each of them has its advantages and disadvantages.
Types of lighting fixtures for the garage
- Incandescent lamps are a traditional and very affordable type of lighting. Have a low price, but the service life is short. Yellow spectrum of emitted light and a large amount of heat, that stands out. Efficiency - no more 45%, consumes a lot of electricity.
Incandescent lamps are an obsolete type of lighting technology and are rarely used today
- Halogen lamps - well-proven lamps, emitting smooth and bright light. The principle of operation is the same, as in "Ilyich's light bulbs" - tungsten filament is heated in a flask, filled with bromine vapor. Halogen lamps have a long service life - up to 5 000 hours. The disadvantage is the sensitivity to voltage fluctuations in the network and the large amount of energy consumed. Operation without a protective cover and the appearance of greasy stains on the surface of the glass bulb significantly reduces the service life.
Halogen lamps must not be touched by hand, otherwise they will burn out quickly
- Fluorescent lamps. Quite a common type of garage lighting. Convenient theme, which gives equal, "Cold" light. Electricity consumption is much lower, than incandescent lamps. Long service life. The principle of operation is, that phosphor, which covers the inner surface of the flask, glowing under the influence of ultraviolet rays. The disadvantages include the high content of mercury vapor, which may be harmful to health. in addition, at voltage differences such lamp can work unevenly, there is a flicker effect.
Fluorescent lamps have a long service life and consume less electricity, than incandescent lamps
- Energy saving lamps. One of the most profitable lighting options. It has a low level of electricity consumption, good light output and long service life. There is a large selection of shapes and colors on sale (mat, yellow, white, etc.. d.). Disadvantages - above average price and mercury vapor, fill the insides of the lamp.
Energy saving lamps (CCL) consume a minimum of electricity, but are expensive and contain mercury vapor
- LED lamps. High performance - low energy consumption, long service life (to 100 thousand. hours), equal, bright light. A huge advantage is the safety of such lamps. Minus - high price.
Installation of lighting in the garage
The whole process of installing lighting in the garage can be divided into several mandatory stages.
- Input of power cable voltage into the room.
The power cable can be routed to the garage by air or through underground communications
- Installation of a switchboard.
The metal housing of the switch cabinet must be earthed
- Placement of lighting fixtures and power outlets for small mechanization.
- Grounding.
Grounding of separately located constructions is most often carried out in the form of a triangular contour from pins buried on some meters.
The procedure is not crucial. You can start by breeding internal lines and build them on the switchboard. But you can also immediately after the introduction of the power cable inside the garage to install a shield, from which to extend the wires directly to the electrical points. If grounding must be done autonomously, it is more logical to prepare the tires in advance. If the room is supplied with a three-core cable with "ground", then there is no need for additional work.
Rules of electrification of the garage
- Rules of installation of electrical equipment (PUE) testify: the entrance of the power cable through the air is carried out at a safe height of at least 2,75 m from the ground. If the garage wall is lower, a metal rack is used, in common parlance called "goose". The hole in the wall is made with an inclination of 3-5 ° outwards. This helps to remove moisture, falling on the cable in the rain. It is important to correctly calculate the parameters of the conductor. The cross-sectional area is selected based on the total capacity of consumers, increased by 30-50% in case of possible modernization of equipment. If the cable is routed underground, the requirements remain the same. When external wiring, it must be placed in a metal pipe to protect against possible mechanical damage. You can connect to the electric meter yourself, but before the start of operation it is necessary to invite an employee of "Energozbut" to verify and install the seal. After that, a contract for the provision of services is concluded and a current account is set up to pay for the electricity used.
The cable is inserted into the garage through the hole, in which the metal or plastic sleeve is inserted
- It is recommended to install the switchboard in a metal or plastic cabinet. It contains a meter, safety shut-off device (UZO), circuit breakers. The parameters of the electrical equipment inside the switchboard are discussed in more detail below.
- Grounding is performed in that case, if it is not online. For a private garage, it is enough to drive a metal pin into the ground to a depth of 1.5–2 m (example, fittings or profile corner) and connect it to the internal network via a bus in the switchboard. Many motorists neglect this safety measure, but in PUE it is strongly recommended to ground not only the network, but also machines with iron frames, as well as the garage building, if it is metal.
There are certain requirements for garage lighting:
- light fluxes should be evenly distributed throughout the space;
- preference is given to the use of energy-saving lamps;
- lighting control is designed on a modular basis, voltage lamps are installed in certain areas 12 volt.
Preparatory work before the installation of garage lighting
In order to properly distribute electricity in the garage, it is necessary first of all to make the general scheme. It displays the location of the lamps, sockets and stationary electrical equipment. You can make a sketch on a sheet of paper with an ordinary pencil, or you can - on a computer in a special program. The essence of this does not change. The purpose of the scheme - to visualize the location of the main (auxiliary) electrical appliances in relation to real terrain. According to the scheme, it is easy to calculate all the necessary components of the wiring, number of lamps, sockets, junction boxes, etc.. d. According to experts, Properly designed scheme saves time and money on 15-20%.
Properly designed lighting device will save time and money
You need to accurately transfer to the drawings all the dimensions of the garage. Then calculating the length of the conductors will not be much work.
Lighting is planned depending on the arrangement of furniture and equipment in the garage and its size
Necessary tools and materials
The following tools are required to perform electrical work:
- a set of electrical screwdrivers with different slot configurations;
- than, pliers, side cutters;
- electric drill or screwdriver.
When laying hidden wiring are additionally required:
- perforator, Bulgarian;
- a set of crowns for drilling holes in concrete or brick;
- spatulas, buckets for preparation of plaster mix, grinding bar.
Depending on the conditions and materials, from which garage walls are made, wiring can be hidden or external. Concealed wiring requires large material costs and time. But the cables are well protected from mechanical impact and do not spoil the appearance in the room. External wiring has its undeniable advantages - speed of installation, low cost, availability for repair. Using plastic cable ducts, you can protect the wiring from external influences and give it a harmonious appearance.
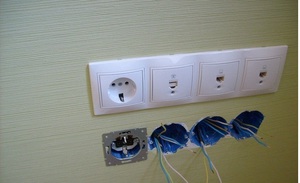
Blocks of sockets of different voltage in the cable channels are distinguished by different colors
Preliminary calculations
After drawing up the scheme calculation of section of conductors and power of illuminators is carried out. The following regulations are used:
- per square meter of area required from 15 to 20 Watt of lighting power (the equivalent of an incandescent lamp);
- at a ceiling height no more 2,5 m in the calculations used coefficient, equal to 1,5;
- the calculation of lamp power is carried out according to the formula P = p x S / n, where P is the total power, p - power on 1 m2, S is the area of the room, n is the number of lamps.
You can also choose the conductor cross section, using ready-made recommendations, developed by electricians.
Table: choice of copper cable cross section
| Cross section of the vein, mm2 | High-voltage 220 V | High-voltage 380 V | ||
| Current, A | Power, kw | Current, A | Power, kw | |
| 1,5 | Nineteen | 4,1 | Sixteen | 10,5 |
| 2,5 | Twenty-seven | 5,9 | Twenty five | 16,5 |
| Four | Thirty eight | 8,3 | Thirty | 19,8 |
| Six | Forty six | 10,1 | Fourty | 26,4 |
| Ten | Seventy | 15,4 | Fifty | 33,0 |
You can also use one of the many services on the Internet, which online will recommend the required types and sizes of wires.
If there is a manhole in the garage and (or) basement PUE provide a device for special lighting indoors. It is considered optimal to supply voltage to 12-36 volt. This current is not dangerous to humans in the event of a short circuit (KZ) does not ignite.
The garage pit is illuminated by lamps, powered by voltage 12-36 Volt
According to the rules of installation of electrical equipment sockets with different voltages of 12V and 220V) must have different colors and configurations. Visual differences will not confuse the current source during operation.
Step-by-step instructions for installing lighting in the garage
The sequence of work on the installation of wiring in the garage consists of the following steps.
- Drawing up a detailed breeding plan based on the specific dimensions of the garage. This will allow you to accurately determine the required amount of cable. For lighting, usually, a three-core cable with a cross section is used 1,5 mm2. For sockets, the cross section of the conductor must be at least 2,5 mm2. Cable brand for external wiring - VVG ng LS, when hidden - VVG ng. If there are units in the equipment, designed for 380 volt, must be agreed with the supplier (Energozbut) wiring of three-phase current.
Powerful welding equipment is designed to consume three-phase current 380 Volt
- Procurement of the required number of lamps, switches, sockets, junction boxes. When using low voltage (LED) luminaires buy the appropriate number of transformers. It is better to buy products well-established manufacturers. The quality of plastic depends on the wear resistance of the product and service life.
LED luminaires are connected via a DC power supply
- Installation of electrical outlets: sockets and lighting fixtures. If hidden wiring is done, in the walls and on the ceiling gutters. This can be done with a punch or Bulgarian. Holes for the diameter of the product are drilled in the places of installation of sub-sockets and junction boxes. After laying the cable strobe is sealed with gypsum mixture and sanded to the level of plaster. If the wiring is made on the wall surface, it is necessary to fasten cables in protective sleeves (metal or plastic) or in cable channels. The sleeves are attached to the wall with special clips. Cable ducts are standard mounting (screws, dowel-nails or glue).
Before laying the cable in the groove, be sure to wind it into the corrugated hose
- Laying connecting cables. Junction boxes are used for switching power lines. The wires inside the boxes are connected with terminals, pads or soldered scrolls. To date, soldering contacts has receded into the background (although junction boxes are still often referred to as "unsoldering"). Mechanical fasteners have reached this level of quality, that are no different from soldered. The time savings are obvious. The main condition for installation is to carefully tighten the cores in the terminals. They should not have backlash and be easy to pull out. Another benefit of this type of connection is the ability to share aluminum and copper wires, as well as ease of repair and switching, if such a need arises.
It is convenient to switch wires inside the junction box with the help of insulating caps
- Output wires to the switchboard, connection to output terminals via RCDs and circuit breakers. It is important to install appliances with the right settings. The differential current of the ELV should not exceed 30 mA, the grounding comb is connected either to the stand-alone ground bus, or to the ground wire from the mains. The neutral wires are also reduced to one comb. Circuit breakers are usually installed by consumption groups. Example, one serves lighting, the other is sockets, the third is a dedicated line (compressor, desktop drilling machine, etc.).
Each machine, mounted on the shield, should be responsible for its set of consumers
- Carrying out a control start of the system, check the operation of all devices. If everything works properly, junction boxes close (sometimes walled up), cable duct covers are installed in the working position (usually, on a plastic latch or sealant). The operation of sockets is checked by an indicator or connection of any device (example, table lamp).
The phase indicator quickly detects the presence of phase in the network
This is the basic algorithm for laying the standard voltage wiring 220-230 volt. You need to know a few differences when installing lighting equipment on 12 volt. The specificity of low voltage is, that a special step-down transformer must be used to convert the current. It is installed directly next to the lamp, since attempting to transmit low voltage over long distances will result in power loss due to high resistance of the conductor. An ordinary cable with rated voltage is supplied to the transformer 220 V. If factory-made LEDs are used, there will be no difficulties with the connection of the transformer. Just connect the wires according to this scheme. Grounding in such lamps is not used. Therefore, the third core is simply wrapped with insulating tape.
The LED tape is mounted on an adhesive base, can bend at any angle and provides a smooth and bright glow along the entire length of the garage
An interesting solution for lighting the garage is the use of LED strips. In recent years, the quality of this type of lighting equipment has reached this level, that the tape works great in any adverse conditions, even underwater. They come in different colors, capacities and degrees of protection. The choice is huge, everyone can find a ribbon for the garage to taste. They are also connected via a transformer. To do this, connect the power cable from the mains 220 In the terminals marked "N" and "L" (phase wire is wound on the clamp "L"), and connect the LED strip contacts to the "+" and "-" terminals, adhering to the polarity. Standard tape length 5 meters, but it can be adjusted - lengthened with connectors or shortened, cutting ribbons into pieces.
The power source for the LED strip is a step-down transformer
Video: garage lamp with led strip
Installation of an electric board
Consider in more detail the installation of a distribution cabinet. Much depends on the choice of its location. The rules are stipulated, that switchboards are installed in a convenient place for use and maintenance. in addition:
- height above floor level is defined within 150-180 cm;
- the distance from the shield to the water pipes and sewer system should be no more 1 m (PUE n. 7.1.28);
- the cabinet material must be fireproof (does not support combustion);
- the door must be secured with a locking device (castle, latch, latch) and an overview window, through which the numbers on the meter should be clearly visible.
The switchboard must be locked and have a window for viewing meter readings
Usually, the input cable comes to the garage from the door. There is also a distribution cabinet. The sequence of actions is as follows:
- Secure the box in the selected location. Self-tapping screws are usually used for fastening, which are screwed into the wall through special holes in the rear wall of the shield.
- Get all the cables on the shield. To do this, the side walls have special holes with seals.
- Attach the DIN rail. This is a special metal plate, on which all electrical appliances are installed.
The DIN rail has special protrusions for mounting modular electrical appliances
- Attach all the necessary elements (counter, machines, PZV) on a DIN-rail by means of clamps available on them.
Circuit breakers, zero pads and other modular elements have latches for installation on a DIN rail
- Install the zero pad.
- Clean the wires. If a stranded cable is used, it is desirable to crimp the ends of the wires. Connections from several single-core wires are also crimped. This will require a special tool - press pliers.
It is advisable to crimp stranded wires or the joints of several conductors
- Make the connection according to the scheme. Phase wires are wound in automatic machines and ELVs, zero - are connected via a zero pad.
- Tighten all connections with maximum force. This must be done to eliminate possible rattle contacts.
- Invite a representative of the energy sales company to seal the meter and obtain permission to put the system into operation.
Now, walking out of the garage, do not forget to turn off all machines.
In conclusion, let's talk about it, which wires are best to do the installation. The following norms are accepted for the cross-sectional area of the input cable :
- for current 25 A - 6 mm2;
- for current 40 A - 10 mm2;
- for current 63 A - 16 mm2.
The power equipment inside the shield is connected by copper single-core wires. According to accepted standards, the intersection of these wires should be:
- at maximum current in 15 — 1,5 mm2;
- at maximum current in 21 — 2,5 mm2;
- at maximum current in 27 A - 4 mm2;
- at maximum current in 34 A - 6 mm2.
The current is higher 30 rarely used in private garages. As practice has shown, most commonly used cables from 1,5 to 4 mm2.
Video: modernization of light in the garage
Everyone can make their own wiring in the garage. To do this, be careful when handling electricity and follow the rules of personal safety. Consultation with an experienced electrician will help determine the choice of materials on the market. Careful study of PUE will avoid gross errors.