The scheme of connection of the automatic machine in an electric board with the hands: advice from experienced electricians
It is very difficult to imagine a modern apartment without various electronics, which creates some inconvenience with the connection and high load on the grid. To increase electrical safety and reduce the load, it is necessary to consider separate control of devices and to establish the control unit in an electric board of the house. Laying cables and the correct layout of the electrical panel can be done independently in the apartment, but as for the completion of work, then there is no way to do without a specialist, as it is necessary to have an idea of the structure of the switchboard, different standards, circuits and be able to make connections.
Requirements for electrical panels
Choosing and buying an electrical panel is a very important and responsible business, as not only convenience in use of electric devices depends on this choice, but also security in the house. There are certain requirements for shields and their installation, which are registered in GOST 51778-2001 and PUE. Next, you can read a list of these requirements and rules for the shield and its installation:
- electrical panels must be filled in accordance with the technical documentation accompanying them, which shows the number of installed machines and their rated current;
- the shield must have an electrical safety icon indicating the voltage (220In or 380V);
- the shield must be made of non-combustible material and have a coating, which does not conduct current. It can be plastic or metal, covered with special paint;
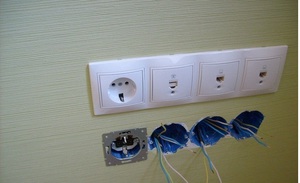
- it is necessary to carry out dismantling inside a guard, making on the wires marking, indicating groups of connected devices;
- jumpers between automatic machines are made by means of special bus drives;
- the door and the body of the shield must be earthed. Also on the door you need to provide lugs or some other element, so that the inspecting organization could seal it;
- buying a shield, check the technical passport, where it will be displayed: type of shield, name of the manufacturer, certificate, GOST, rated currents of the input and protective devices of the RCD, voltage and frequency, rated current of the shield, rated operating currents of RCD devices, degree of protection, shield class, connection instructions, weight and dimensions.
If you follow the above requirements, as well as requirements, specified in GOST and PUE, then you can easily buy, install and connect the shield at home. In addition to this knowledge, you will also need to have on hand and the electrical circuit of the control panel, that there were no difficulties at acceptance of works by employees of ZhEK.
Drawing up the scheme of an electric board
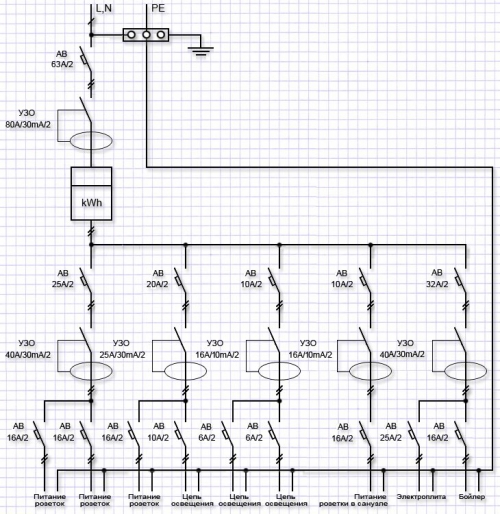
An important step in installing an electrical panel is to create its circuit. There are several explanations for this. Let's say, if you plan in the future to repair or upgrade wiring in the apartment, with the help of the scheme you can quickly install, for which each machine gun and part in the shield is responsible. Also the scheme will be necessary at acceptance of works by the electrician. In addition, connect the wires, having such a scheme in hand, much easier. You can draw it by hand, and in specialized programs, then print.
The electrical circuit is created in several stages. The first step is to find out, what is in the house power supply system, then divide all points of electricity consumption into several categories. After this, on the basis of already available data the scheme of a guard is created. It is extremely important, that the symbols were used in the scheme, which are described in detail in GOST 21.614 "Images of conventional graphic electrical equipment and wiring in the original".
so, as mentioned above, all work begins with determining the power supply system and grounding in the apartment, as the connection of a guard will depend on it. You can find out, looking at the shield on the floor or going to the housing office. Often, three TN-C systems are installed in residential areas, ТN-S, ТN-С-S.
It is worth noting at once, that the first system was created according to the old GOST and was used in homes, which were built before 1998 p. The TN - C system is represented by two - core copper or aluminum wiring. A three-phase cable went to the floor switchboard ( L ) from one residential PEN , in which earth and zero are combined. The last two systems are used in modern homes. The apartment has three-core copper wire, and a cable with three phases is connected to the shield ( L ), zero ( N ) and ground PE ( S ).
Розбийте на точки
After that, the dots are divided to connect into several groups. Many are wondering: why all this? And very simple. This way you can use materials more economically and simplify the installation of the electrical panel. You can group as your heart desires. You can build a living space under one machine, on the other hang the boiler, on the third machine air conditioning, etc.. d. And each group needs a machine with its own characteristics.
20A machines are required for sockets, for lighting systems and switches - 16A machines, for electric stove - from 32A, for boiler, washing machine and air conditioning at 25A. By the way, should be considered, that sometimes on sockets, lighting and switches, it may be necessary to install additional machines at 25A and 40A.
When you specify the power supply and grounding system of the house, and divide the connection points of electrical appliances into groups, start drawing the scheme itself. If you have all the necessary data, its creation does not take much time. Again, should be considered, that you have a concept with symbols from GOST 21.614. Finishing with the scheme, you can start work on the connection. Having relevant experience, installation will not take you long.
Installation of electrical panels
Before installing the electrical panel, two things need to be done. The first is to purchase the necessary materials, the second is to arrange a place for him. And now let's talk about everything in order and start with the choice of shield.
It is worth noting at once, that the shields are built-in and hinged, and their choice depends on several factors. If the wiring is hidden, then pay attention to the first type, and if open for a second. Do not forget, that the projects of new apartments under the shields provided a special niche. As for apartments in old houses, then there is no such thing and therefore will have to hang a hinged shield. If it does not fit very well into the interior, then it can be masked with drywall. You can also make a niche in the wall. To do this, you need to be sure, that the wall does not bear.
Second - the size of the electrical panel depends on the number of installed machines. According to Gost, the shields are on 6, 12, 18, 24, 30 machines or 6, 9, 12 threaded fuses. By the way, the shield must be taken in reserve. If you plan to install according to the scheme 12 machines, then it is recommended to take the shield on 18. So, you will be able to protect yourself from additional costs in case of installation of additional machines.
With the choice of machines and wires, everything is much easier, since the former have the main characteristic, which is shown in the diagram, that's all, what you need - buy the right one. Now on the wires. It's even easier here, because the wires inside the shield are taken from the main wiring, and then attached to the machines. The only nuance will be the use of special copper tires with insulation.
Place for installation
so, with the choice of the shield and its "stuffing" is over. Now comes the second stage, namely the choice of location. Turning to GOST, the shield should be easily accessible, with, if it is installed at the door, to be open, they did not close it. It must be at a height, about, one and a half meters from the ceiling.
After this, if necessary, make a niche under the shield, Well, and if not, then just drill holes for mounting and hang it on the wall. It is extremely important to do all the work in advance, associated with the use of power tools, because during the installation and connection of the shield, there must be no electricity supply in the apartment.
To fix the shield on the wall, it has holes for screws. To start wiring in it, holes are provided in the walls of the shield, which can be closed with plugs. Removing them, wind inside the cable and wiring. Taking self-tapping screws, secure the shield in the pre-drilled holes. If the shield is mounted in the wall, then the cracks around it should be covered with putty and give it time to dry. Watch at the same time, so that the body was level or slightly protruding from the wall. Otherwise, you will hardly be able to fasten the shield door. so, important points:
- Fixing the shield on the wall.
- Elimination of cracks.
- Posting conclusion.
What is important to do
And here you come, to, apparently, the most important moment - filling the shield. In fact, there is nothing complicated about it. To begin, install the neutral and ground bus. Most often, the neutral bus is connected to the top of the shield, and grounding - at the bottom. They are fixed with self-tapping screws. After that, the machines are connected, PZV, which are fastened by means of all the same self-tapping screws.
Further, it will be necessary to connect the power cable and internal wiring. The power cable has three cores - white, blue and yellow with a green stripe. The blue vein is zero, which connects to the zero bus. White - phase, which connects to the nearest machine at the top. And the last core is connected to the ground bus. A similar procedure is performed with the wiring of the apartment. The phase wires are usually red or brown, and connects to the bottom of the circuit breaker. Keep an eye on that at the same time, to wire the phase of a group, was connected to the machine, which is set aside for her, which will help in the future to avoid confusion in the operation and maintenance of the shield.
After that, all you have to do is connect all the machines on the phase side. For this purpose it is possible to use special isolated copper tires or by means of VVG-5 * 6 wires, used to wind the cable from the shield in the entrance to the shield in the apartment. To connect vending machines, you need to cut it into pieces lengthwise 4-5 cm and connect in series to the upper parts of the machines, starting with that, to which the phase is connected.
Nuances when connecting
But if the scheme has additional machines, which unite groups of electrical appliances, then they need to be connected as follows: at the top to the phase, and zero is connected to the lower wire, and from them to the zero bus and phase, which differs in the group of machines. It is important not to confuse the wires when connecting them - for this there are appropriate markings on the RCD, and therefore make the process of disconnection without problems.
If you live in a private or modern apartment building, then it is not uncommon to use 380V input for the switchboard, that is, it is powered by a four-core or five-core cable (in the latter case, the fifth ground wire). Three phases of different names are connected to the entrance machine, which then go to the counter. From it they go to the general automatic machine, after which the phases go to a single-phase circuit breaker to connect the equipment, designed for 220V.
It happens, that you need to connect the device to 380V, and this requires a three-phase circuit breaker. Remember, that between different phases the voltage is always 380V, while between zero and one phase - 220V. So be careful - if you apply for home appliances two phases instead of zero and phase, then it will just fail.
Recommendations for assembling an electrical panel in the apartment
As you can see, there is nothing complicated in installing and connecting the electrical panel in the apartment. This is an extremely simple task, which can handle even those far from these cases. The most important thing is to learn the rules, are given in PUE and GOST, and follow them clearly, and completing all installation work, ring each item with an error tester. If all goes well, then call an electrician from ZhEK, that he accepted the job and included your apartment in the general network of the house.
Finally, instead of summing up, general recommendations for assembling an electrical panel will be given:
the shield should be slightly larger, to the future, if there is a need for additional machines, did not have to change it;
- It is not recommended to combine several different household appliances under one safety cut-out device, because it can happen, that the computer in the living room will turn off, and a hairdryer in the bathroom. Therefore, the zone is territorial: kitchen separately, bathroom with separate toilet, etc.. d.;
- it is recommended to install the safety shut-off device after the circuit breaker according to the scheme, moreover, it must be one step above the rated current. An example, the automatic / ELV pair must be 16A / 25A, because the ELV does not respond to a short circuit. The machine must be responsible for this, therefore it is better to take the RCD with the face value above, to eliminate the possibility of its burning. You can also set the same values, there will be no mistakes here;
- ideally there will be installation of RCD on each zone after the automatic machine, but because of the high cost of the first, it is necessary to hang several submachine guns on one ELV;
- RCDs and differential circuit breakers are not recommended for sockets, where the computer will be turned on, as it may cause the protection to fail, especially if you calculate the trigger threshold incorrectly;
- electronic or mechanical RCD - this question is faced by many buyers. The latter will be the most ideal option, due to its reliability and independence from electricity;
- RCDs and machines must be installed correctly. If it protects several machines and stands in front of them according to the scheme - this is a violation, and in front of the ELV is an introductory circuit breaker, or even several. The point is, that it is forbidden by the rules of energy supervision. According to the requirements of this organization, an automatic must be installed on the input cable, after him - the counter and only then the RCD. By the way, a differential circuit breaker can be installed in front of the meter.