Inverter welding: process description, welding lesson for beginners, video instruction
Welding is a reliable process of joining two metal parts together. Experienced welders and home craftsmen use it to make various containers, stoves for garages and baths, greenhouse frames, metal gates and other necessary household items. At first glance it seems, that the welding process is simple, however, this is far from the case.
You first need to learn a lot and take into account a lot. So, before embarking on self-manufacturing products by welding, it is recommended to study this process, learn all its intricacies, watch video tutorial. Beginner welders are best to start welding training with an easy-to-operate inverter.
What is an inverter device
Such equipment has appeared relatively recently, greatly facilitating the work of most welders. The use of a new method of welding has significantly reduced the size of the device and the weight of its equipment. Beginner welders will simply learn to connect parts with the most convenient and very economical inverter.
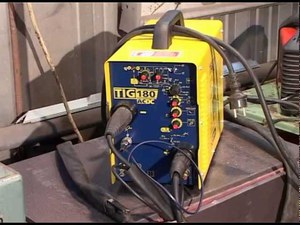
Inverter welding machine is a small box, whose weight depends on its power and can range from 3 to 7 kg. The whole structure is in a mechanical housing with vents, which can be carried with a handle or belt.
On the panel of the device there is a toggle switch or a handle to turn on the power. Overheating and power indicators are located on the front of the case. There are two outputs for connecting working cables - "plus" and "minus". One cable of the device ends with an electrode, and the second clip-clip. Their power connector is on the end of the case. The device is equipped with special handles for setting the welding current and voltage.
The principle of operation of the inverter device
The inverter works from a usual household electric network with frequency 50 Hz.
- The device has a rectifier circuit, by means of which alternating current is converted into direct current.
- After that, a special filter is the final smoothing.
- The inverter is called the electrical unit of the device, in which direct current is converted into alternating current. The output frequency is measured in tens of kilohertz. Sometimes this value can be up to 60 kHz Depending on the device model).
- The output high-frequency current is reduced to the desired voltage, resulting in the current reaches the required value for welding in 120-200 ampere.
Such a double transformation is required for this, so that small transformers in weight and volume can be used to reduce the high-frequency voltage. So, example, a transformer is required for an inverter with a current of 160A 250 grams. The weight of the equipment for work on the old technology is 18 kilogram.
Advantages and disadvantages of welding inverter
Along with light weight, modern welding machine has many other advantages:
With the help of its control scheme, you can implement many functions, which will greatly facilitate the welding process. It, example, preventing the electrode from sticking or facilitating the ignition of the arc.
- The inverter can perform argon arc welding, using tungsten electrodes.
- You can use different electrodes for welding, which is of great importance in the processing of non-ferrous metals, cast iron or various types of alloys.
For a more objective description of this welding device, it is worth noting its shortcomings:
- a significant disadvantage of such equipment is its price, which in 2-3 times higher than conventional welding machines;
- if the inverter is used frequently and for a long time, it must be cleaned regularly, as it is very sensitive to dust due to semiconductor parts;
- the cable of the device should be no more 2,5 meters long, which significantly limits the movements of the welder;
- many models of such equipment are not recommended for use at low temperatures.
Inverter welding for beginners - instructions
Before starting work, who will connect the parts with the help of a welding machine for the first time, it is recommended to study the welding process itself, watching videos for this. It can be divided into several stages:
At the first stage there is a short circuit of the electrode and the metal, as evidenced by the formation of the arc.
- A high temperature is created, under the influence of which the processed materials melt.
- As a result of melting of edges of metal details and an electrode there is a connection of preparations and the seam leaves.
The electrode plays an important role during the welding process, which is used to form a welding bath without oxygen. The powder applied to it is necessary to maintain uniform combustion of the arc.
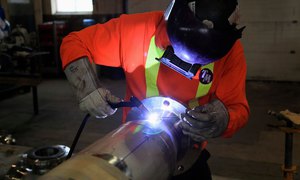
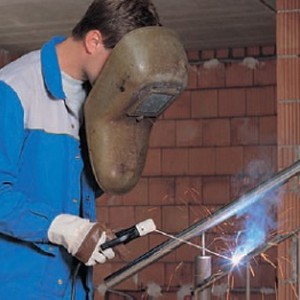
Before starting work, the welder must prepare protective ammunition for himself:
- rough jacket;
- special protective helmet;
- coarse gloves.
Now you need to select the electrode and adjust the welding current. For inverter devices, the electrodes must have a diameter 2-5 mm Depending on their thickness and the thickness of the workpieces, the welding current is set. What should be its value is usually indicated on the inverter housing.
Once everything is ready, the ground terminal is connected to the welded surface and the welding process begins. To prevent the electrode from sticking, it is not recommended to bring it close to the metal surface during welding.
Step-by-step instructions for inverter welding for beginners:
To ignite the arc, the electrode to the part should be raised slightly at an angle, and to activate it, touch the metal surface several times.
- After the arc appeared, the electrode is held at some distance (equal to its diameter) from the product. The weld should come out.
- The scale on top of the seam must be removed with a heavy hard tool, you can hammer.
They, that after the welding process should come out, can be seen in the video with a lesson for beginner welders.
Arc gap
Experienced welders perform all the work almost without looking, but beginners during this process must carefully monitor the arc gap. Maintaining the same value during welding is important.
If the gap is large , that rainbow starts to jump, and the surfacing material is crooked.
With a small gap, the base metal will not have time to warm up and the seam will be convex.
Providing a gap with the optimal distance will be a good boil, and the result will be a smooth and normal seam. Also in the welding process do not forget, that the electrode melts gradually. So, if it is not moved, then the distance between it and the metal will increase.
A lesson for beginners on the formation of the correct seam
It is very important to monitor during welding, that the seam was at the level of metal. Deeply and intensely flowing into the material arc pushes the bath back, resulting in a seam. If the movements of the electrode are too fast, then the seam will be defective.
Zigzag and circular motions can be made to form a perfect seam.
- When moving in different directions, the formation of the seam should be controlled first from one edge of the part, then from the top of the bath and then from the other edge of the product.
- At circular movements the bath is distributed on a circle and the seam level is controlled.
Changing direction, you need to know, that the bath follows the heat. When the metal electrode is not enough, an undercut is formed. To prevent its occurrence, you must carefully monitor the bathroom and control the external borders.
With the help of an arc located at the end of the electrode, you can manipulate the bathroom. When the electrode is tilted, it will stretch, and push.
The more vertical the location of the electrode, the less convex the seam will be, since the bath will melt well, pressed down and spread around.
If the electrode is tilted too much, then after applying the white fabric in the direction of the seam, the force will not control the bath.
When the electrode is slightly inclined, the seam pops up, as the force goes back.
So for that, to move the bath back or get a flat seam, the inclinations of the electrode must be at different angles. It is necessary to begin with a corner in 45 to 90 degrees. With this angle you can properly perform welding and get a flat seam.
Tim, who planned to learn welding, it is best to do this with an inverter. Easy to use, it is ideal for novice welders. However, you should know, that models can be sold, which are suitable for amateur welding, as well as expensive equipment for professionals, which is most often used in industry. We should not forget about that, that personal protective equipment is required for welding work. In no case can you look at the arc without a special mask.