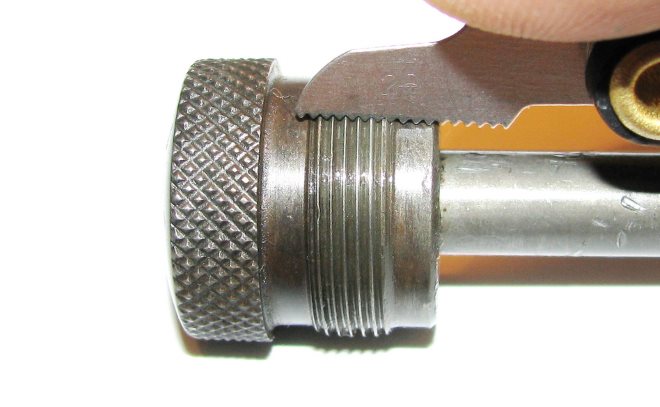
Metric thread: GUEST, table of sizes and pitch of metric threads
Metric thread is a screw thread on the outer or inner surfaces of products. The shape of the protrusions and depressions, which form it, represents a triangle. Metric this thread is called back, that all its geometric parameters are measured in millimeters. It can be applied to the surface as cylindrical, and conical shape and used for the manufacture of fasteners for various purposes. in addition, depending on the direction of lifting of turns of a carving of metric type happens right or left. In addition to the metric, as you know, there are other types of thread - inch, pitch, etc.. A separate category is modular carving, which is used to make worm gear elements.

The reliability of the detachable connection depends on the accuracy of the metric thread
Basic parameters and areas of application
The most common is the metric thread, applied to the outer and inner surfaces of the cylindrical shape. It is most often used in the manufacture of fasteners of various types:
- anchor and ordinary bolts;
- nuts;
- hairpins;
- screws, etc..
Details of conical shape, on the surface of which a metric thread is applied, needed in those cases, when creating a connection, it is necessary to provide high tightness. Metric thread profile, applied to conical surfaces, allows you to form tight joints even without the use of additional sealing elements. That is why it is successfully used in the installation of pipelines, on which different environments are transported, as well as in the manufacture of plugs for tanks, containing liquid and gaseous substances. It should be borne in mind, that the profile of the thread of the metric type is the same on cylindrical and conical surfaces.
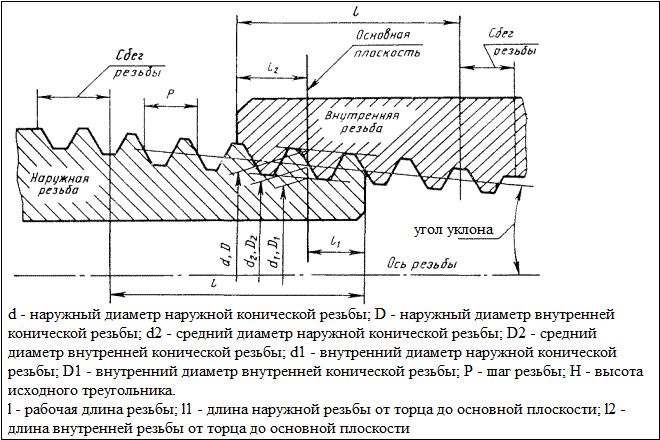
Parameters of a conical metric carving
Types of threads, relating to the metric type, are distinguished by a number of parameters, which include:
- dimensions (diameter and pitch of the thread);
- direction of lifting turns (left or right thread);
- location on the product (internal or external thread).
There are additional parameters, depending on which metric threads are divided into different types.
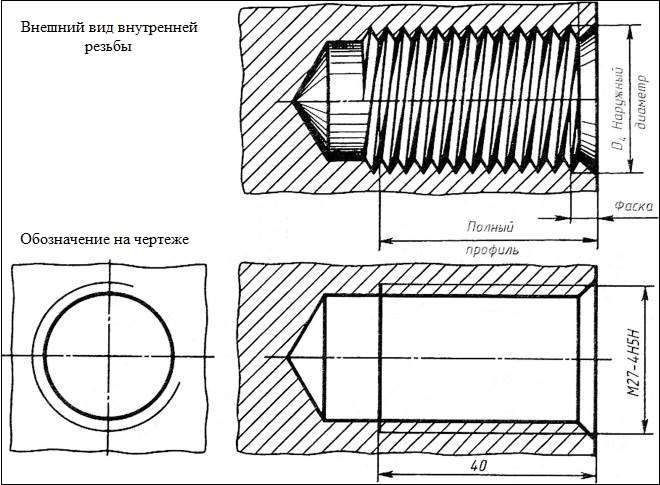
Internal metric thread
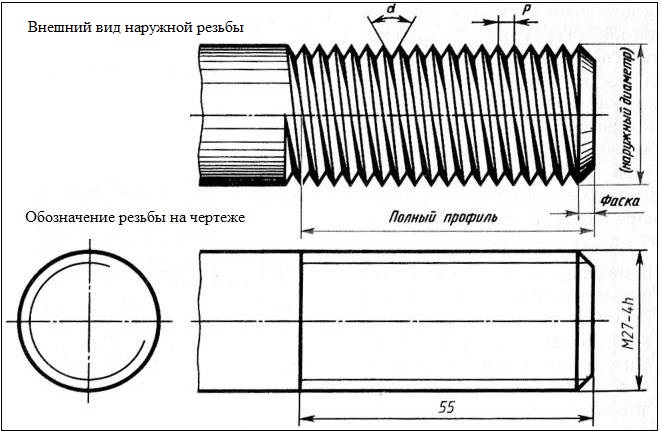
External metric thread
geometric parameters
Consider the geometric parameters, which characterize the main elements of the thread of the metric type.
- The nominal thread diameter is denoted by the letters D and d. The letter D means the nominal diameter of the external thread, and under the letter d - a similar parameter of the internal.
- The average diameter of the thread depending on its external or internal location is denoted by the letters D2 and d2.
- The inner diameter of the thread depending on its external or internal location is denoted by D1 and d1.
- The inner diameter of the bolt is used to calculate stresses, created in the structure of such fasteners.
- The thread pitch characterizes the distance between the vertices or depressions of adjacent threaded turns. For a threaded element of the same diameter distinguish the main step, as well as the thread pitch with reduced geometric parameters. To denote this important ??characteristics use the letter P.
- The course of the thread is the distance between the vertices or depressions of adjacent turns, formed by a single helical surface. Thread stroke, which is created by one helical surface (single-pass), equal to her step. in addition, value, which would correspond to the course of the thread, characterizes the magnitude of the linear displacement of the threaded element, committed to them in one turn.
- Such a parameter, as the height of the triangle, which forms the profile of the threaded elements, is denoted by the letter H.
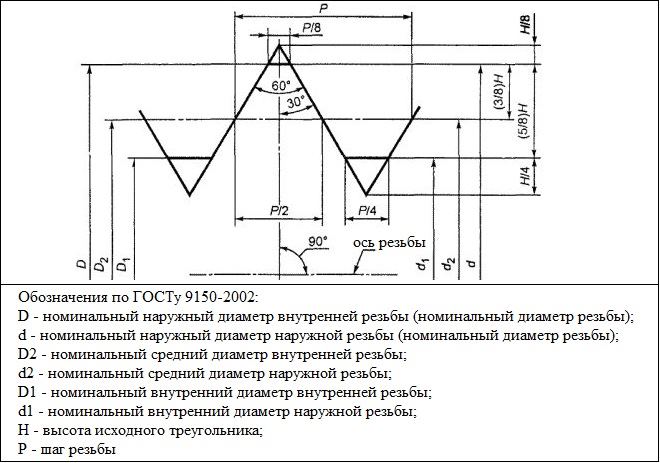
Geometric parameters of the main profile of the metric thread
Table of values of metric thread diameters (all parameters are specified in millimeters)

The value of the diameters of the metric thread (mm)
Complete table of metric threads according to GOST 24705-2004 (all parameters are specified in millimeters)

Complete table of metric threads according to GOST 24705-2004
The main parameters of the metric thread are determined by several regulations.
GUEST 8724
This standard contains requirements for the parameters of the thread pitch and its diameter. GUEST 8724, the current edition of which came into force in 2004 year, is analogous to the international ISO standard 261-98. The requirements of the latter apply to metric threads with a diameter of 1 to 300 mm. Compared to this document, GUEST 8724 operates for a wider range of diameters (0,25-600 mm). At the moment, the current version of GOST 8724 2002, which came into force in 2004 year instead of GOST 8724 81. It should be borne in mind, that GOST 8724 regulates certain parameters of the metric thread, requirements to which determine other standards of threads. Ease of use of GOST 8724 2002 (as well as other similar documents) is, that all the information in it is contained in the tables, which includes metric threads with diameters, located in the above range. The requirements of this standard must meet as the left, and the right thread of the metric type.
GUEST 24705 2004
This standard stipulates, which must have a thread metric basic dimensions. GUEST 24705 2004 applies to all threads, requirements to which are regulated by GOST 8724 2002, and also a GUEST 9150 2002.
GUEST 9150
This is a normative document, in which requirements to a profile of a metric carving are caused. GUEST 9150, in particular, contains information about that, what geometrical parameters the basic thread profile of various standard sizes has to correspond to. GOST requirements 9150, developed in 2002 year, as well as the two previous standards, apply to metric threads, turns of which rise from left to top (right type), and on those, the helical line of which rises to the left (left type). The provisions of this normative document closely resonate with the requirements, which provides GOST 16093 (as well as GOST 24705 and 8724).
GUEST 16093
This standard specifies the requirements for tolerances on metric threads. in addition, GUEST 16093 orders, how the designation of a thread of metric type should be carried out. GUEST 16093 in the latest edition, which came into force in 2005 year, includes the provisions of international ISO standards 965-1 і ISO 965-3. Under the requirements of such a regulatory document, as GOST 16093, falls like the left, and right carving.
Standardized parameters, specified in the tables of threads of metric type, must match the dimensions of the thread in the drawing of the future product. Tool selection, by means of which its cutting will be carried out, must be due to these parameters.
Notation rules
A combination of numbers is used to indicate the tolerance field of a single metric thread diameter, which indicates the accuracy class of the thread, and letters, determining the main deviation. The thread tolerance field must also be indicated by two alphanumeric elements: in the first place - the tolerance field d2 (average diameter), on the other - the tolerance field d (outer diameter). In that case, if the tolerance fields of the outer and middle diameters coincide, then in the designation they are not repeated.

Designation of metric thread
According to the rules, the first to be marked is the thread, then comes the designation of the tolerance field. It should be borne in mind, that the thread pitch in the marking is not indicated. You can find out this parameter from special tables.
The thread designation is also indicated, to which group on the length of screwing it belongs. There are three such groups:
- N is normal, which is not indicated in the designation;
- S - short;
- L - long.
Letters S and L, if necessary, follow the designation of the tolerance field and are separated from it by a long horizontal line.

Example of thread designation on 24 mm of different types (for GOST 8724)
Be sure to include such an important parameter, as landing threaded connection. This is a fraction, which is formed in this way: in the numerator the designation of an internal carving is put down, relating to its tolerance field, and in the denominator - the designation of the tolerance field for the external thread.
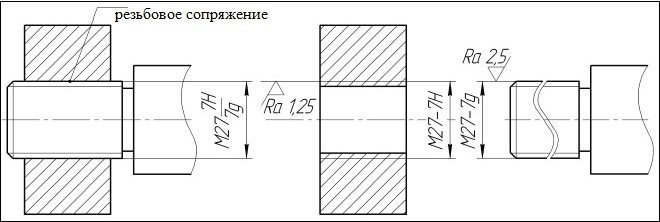
An example of the designation of the landing of the threaded connection in the drawings
tolerance fields
Tolerance fields for a metric threaded element can belong to one of three types:
- accurate (with such tolerance fields the thread is performed, the accuracy of which is subject to high standards);
- medium (a group of tolerance fields for general purpose threads);
- rough (with such tolerance fields perform Threading on hot-rolled bars and in deep blind holes).
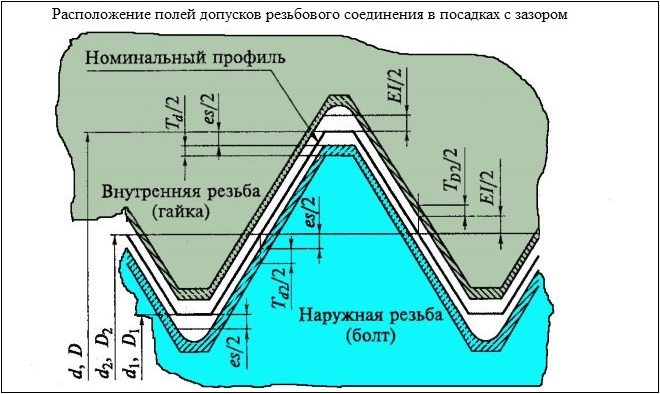
Flexibility of details in a threaded connection is provided by tolerances
Thread tolerance fields are selected from special tables, the following recommendations must be followed:
- tolerance fields are selected first, highlighted in bold;
- in the second - tolerance fields, whose values are entered in the table in light font;
- in the third - fields of tolerances, whose values are given in parentheses;
- in the fourth (for fasteners for commercial purposes) - fields of tolerances, whose values are contained in square brackets.
In some cases it is allowed to use tolerance fields, formed by missing combinations of tables d2 and d. Tolerances and tolerances for threads, which will later be coated, are taken into account in relation to the sizes of a carving product, have not yet been treated with such a coating.
