We sharpen drills on metal: how to sharpen a drill with your own hands, video tips
Definitely, no need to prove it, that any tool, including drills for metal have one unpleasant property - blunt in the process. The speed of this process directly depends on the frequency of use of the drill and the volume, his work.
Very often a person does not pay attention to this until the drill finally becomes unusable, after which it is simply thrown away, which is extremely wasteful. And it happens for that simple reason, that few know, how to properly sharpen drills on metal, besides, that all work can be done independently, handy tools, which will always be in the workshop of the real owner.
How to determine, that the drill became blunt?
Only very sharp tools can be used for metalworking. If in the process of drilling a hole you will hear a not very pleasant squeak in place, where the drill bit touches the metal, that is the first sign that the tool requires sharpening. If such an unpleasant sound appears, it is advisable to stop all work.
If this is neglected, then in the process of rotation the drill will emit a lot of heat, which together with friction will lead to accelerated wear of the tool.
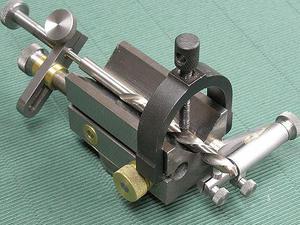
Usually for household needs craftsmen use drills of small diameter to 16 mm. Naturally, it is more convenient to sharpen them on the special equipment, but the cost of such devices for home use is unreasonably high and therefore they are bought very rarely. However, in the pantry or garage of a caring owner there is always a device, which you can sharpen the tool:
- grinding cup with a circle of abrasive material;
- grinder;
- electric drill with a special nozzle.
Any other tool will be suitable for sharpening a drill on metal, on which it is possible to fix a grindstone and to bring it in rotation. However, it is necessary that such a device provides a speed of rotation of at least 1500 about / min.
Preparatory stage before sharpening
Eye protection goggles and gloves must be prepared before sharpening the tool, so as not to injure your hands, as well as a jar of plain water. Explain the importance of safety, definitely, it makes no sense, as human health, primarily.
In the process of microscopic metal particles, sparks and grains of the abrasive wheel can fly in a chaotic manner. If you do not protect exposed areas of the body, then metal shavings and dust can penetrate the skin. But special ??unprotected eyes are exposed to danger at hit, in which any foreign body can have major health problems.
In turn, a jar of water is needed to cool the sharpened drill, as in the course of friction of surfaces of a sharpener and the tool there is a big allocation of thermal energy. If timely cooling of a drill is neglected, then it will overheat and in the process of its intended use, it can quickly break or blunt again.
Technological sequence of sharpening
Naturally, simply prepare protective ammunition and a grinder is far from enough. You can not start work without familiarizing yourself with the technology of sharpening drills for which it is advisable to watch the video. Even so, that the procedure itself is not very complicated, however, it provides for strict adherence to the sequence of work.
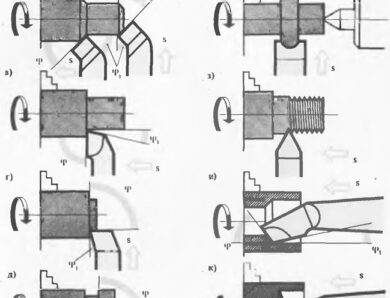
You also need to know, how to sharpen different drills. This can be determined by the shape, which is provided by the cutting edges of the device. Today, experts consider a single-plane, two-plane, conical, cylindrical and screw method of tool sharpening.
To determine the quality of sharpening the drill, it is necessary to carefully inspect it after finishing work.
The main factors, which indicate, that the tool became sharp, there are the following:
- the cutting edge of the drill after sharpening must remain symmetrical about its axis;
- adjacent cutting edges must remain the same length along the central axis;
- the angle of inclination of the pointed edges must also remain the same.
Sharpening of a drill should begin with a back surface of the tool and proceed according to certain sequence.
- Press the trailing edge of the cutting edge as tightly as possible against the grinding surface. It is very important to maintain the initially set angle at all times.
- Not having any skills, the procedure may not work the first time. So you need to be prepared to make a few attempts.
- It is important to carefully inspect the shape of the drill after each attempt.
- The work must continue until the moment, when the correct cone shape is added to the back of the tool.
Only after that, how the required form will be obtained, it is possible to pass to sharpening of a cutting surface. When carrying out works it is necessary to control, that sharpening of each pen was identical. Keeping the right sharpening angle is very important.
In the case of single-plane sharpening method, the rear surface is processed in one plane with strict adherence to the angle within 28-30 degrees. This method is considered one of the simplest and is used for tools with a smaller cross section 3 mm. However, for a full understanding of the process, it is advisable to watch a video about it, how to properly sharpen a drill.
When performing this method, the drill is pressed at a set angle to the surface of the grinding wheel. In the process of sharpening the tool is moved without turning. This can often lead to this, that the cutting edge may break, especially if low-quality metal was used to make the drill.
Conical sharpening is used to sharpen the cutting edge of a tool with a large cross section. This option is more difficult than previously discussed and therefore you need to read the video, then adhere to certain stages of work.
In the left hand take the working part of the tool, and to the right the tail end. The working part should be kept as close as possible to the intake cone.
- Without betraying the situation, the drill is pressed by the cutting part and the rear surface to the end part of the grinding wheel.
- Right hand, which holds the tail edge of the tool, perform rocking, so, to form a conical shape on the back side.
- After one pen is sharpened, pass to the second, exactly repeating the whole process.
- An important nuance of this procedure is that, that the drill cannot be detached from the surface of the grinding wheel.
There is another method of conical sharpening. To do this, the drill is also taken in the left hand from the cutting edge, and right for the reverse end. But only the working part of the tool is pressed to the grinding wheel. Smooth movements without separation from the sharpener drill rotate around the axis, thereby evenly sharpening the back surface of the tool.
The nuances of sharpening a drill, you need to know
When working, it is important to try to keep the shape of the tool, which was given to him at the factory. This maintains the right angle. Conical sharpening is used mainly for drills with a cross section up to 10 mm. For the tool with the big size in addition it is necessary to execute a subpoint.
The size of the front and rear corners will decrease during grinding, and increase the angle of the working edge. This increases the service life of the tool and reduces the width of the transverse edge, which does not participate in drilling.
In industrial conditions, after the tool is sharpened, proof is performed. This measure allows you to get rid of small cracks, remaining after the main process. This makes the drill less prone to wear. Therefore, if possible, it is better not to neglect the proof.
Understand, how to properly sharpen drills on metal is not so difficult, especially if you watch the video of the work. Doing all the work yourself, a person must be patient, since not everything always comes out the first time. If you do not have the patience and desire to sharpen the tool yourself, then you can seek the help of specialists or just buy a new drill.